
A few weeks ago my husband chose two packs of patriotic themed jelly roll strips. To make sure I had enough white mixed in I added a white jelly roll to the order. Then, the fabric sat. I just couldn’t find a pattern or idea i liked for this mixture of fabric.
I eventually came across THIS post on Pinterest and I really liked the idea of sewing three of my jelly roll strips together, then cutting them into squares, and then cutting those into triangles to later create half square triangles.

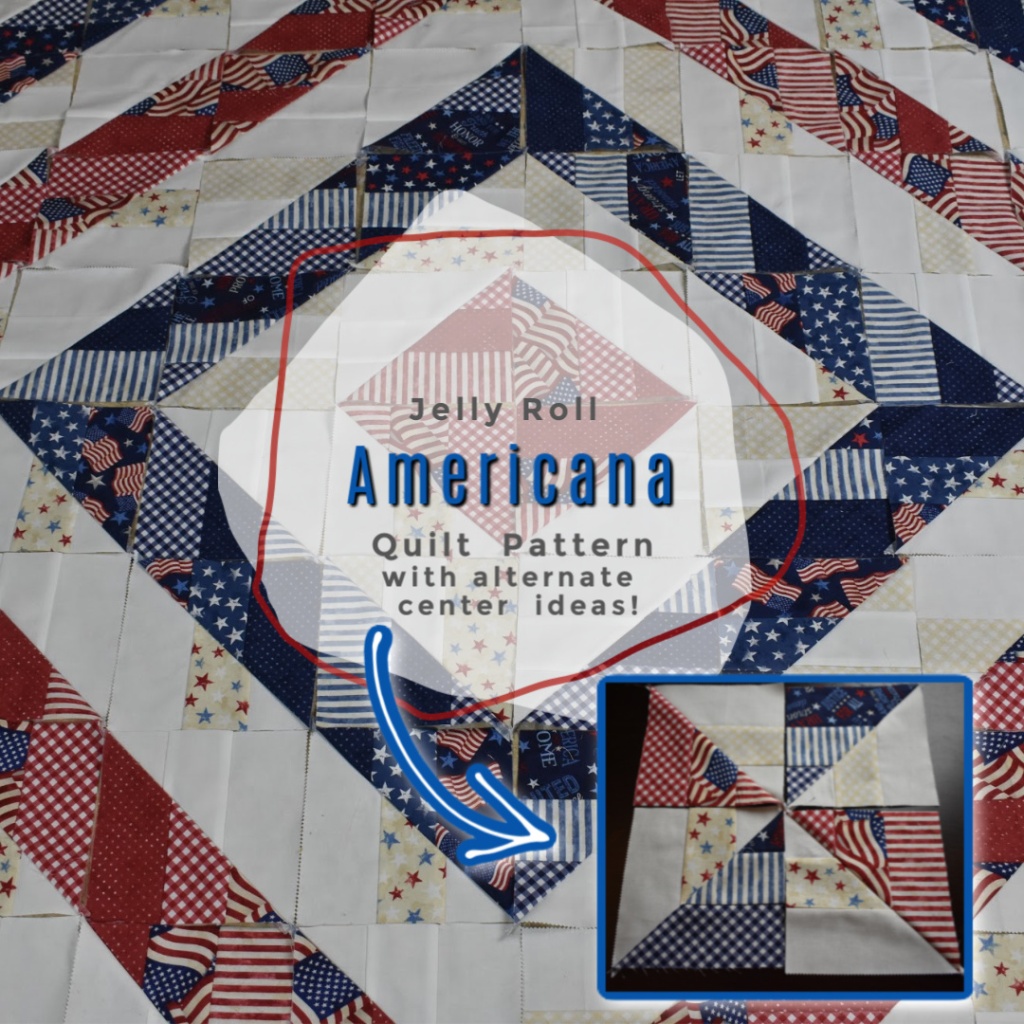
My original idea revolved around a pinwheel center rather than a square center.

I will likely create another quilt with this idea because I am in love with it. However, if you remember, this quilt is for my husband and he didn’t love that it wasn’t symmetrical when it came together.

I even tried an alternative layout with an all red pinwheel.

My heart was slowly breaking (not really, I am just being dramatic) because my husband couldn’t get on board with the red pinwheel center either.
Thankfully, I really like the layout he preferred too. But, I do think the pinwheel has a fun playful feel too.

Don’t you just love how a little shift in the layout of your half square triangles can create so many different designs!?
Fun!
If you would like to create a similar quilt keep in mind you will want extra of your background color (here its white) jelly roll strips.
I purchased my patriotic Jelly Roll HERE. I ordered two. HERE is the white Jelly Roll I purchased. I had quite a bit of both fabrics left over.
Quilting Entertainment
Quilting takes time… Right? There is simply no way to get around that. I have to have something going on in the background to keep me entertained. Cutting fabric and sewing fabric can get monotonous. While I love the entire quilting process… I have to say, some steps are more fun than the others.
So, leave me a comment at the end of this post and let me know what you do while quilting!
Do you listen to music? Watch TV? Listen to audio books?
When I can, I usually watch TV or listen to audio books. I tend to watch TV when I cut my fabric, and I listen to audio books when I sew.
On my quilting Facebook page I asked what everyone’s favorite genre of books was. My aunt replied mystery, which is also my favorite, so we chatted about books we liked. She mentioned an author and title I haven’t read before, so I of course checked it out!
The Unexpected Mrs. Pollifax by Dorothy Gilman.
Mrs. Pollifax is a widow with grown, married children who has become bored with her mundane life. So, naturally, she decides to become a spy which has always been a dream of hers.
Even though this book is a mystery it has an enjoyable easiness to it. You will love Mrs. Pollifax instantly. I highly recommend it.
You can check it out for yourself by clicking the image below.

I finished this book in just two days! Whenever I use this Americana quilt I just know it will remind me of listening to this book!
Getting Started
To start I paired a variety of blues, reds, and white toned strips together in groups of three. You will need enough of these to make whatever size quilt you have in mind. You will need enough white strips to pair with each of your blue and red strips.


I tried to create a nice variety of triple strips.

So, after sewing together a million of these triple strips you will need to press the seams and then cut them into squares and then into triangles.
Measure how wide your strips are as your seam allowance may be different than mine.
I cut my squares to 6.5″.

You should be able to get 6 squares from each strip.

Now you will cut your squares into triangles. One thing to keep in mind when doing this is that depending on which direction you cut the squares you will get a slightly different look.
Observe.

For my squares I tilted them to the left and cut corner to corner. I did the exact same with with my white squares that I will be sewing on the other side.

The right square above shows how my squares all appear in my quilt. I chose this look because… well, I hate trying to match seams. It is disconnected and I am ok with that. The overall look of the quilts will be based around the layout and not whether or not my seams meet at perfect points. Its freeing. Try it!
Now, the left square above will be for those of you who need your seams to meet.

The above pinwheel is made up of squares that has seams that meet within the half square triangle.
So, how do you get your half square triangles to meet perfectly like the squares in the image above? Easy!

You will need to cut the color that is matching the first color in the opposite direction.

So, looking at the image above I cut my red and blue squares from the bottom left corner to the top right corner.
Then I cut the white squares from the bottom right corner to the top left corner.
Just remember. If you use this method you will need to make sure you nest and pin your seams to make sure it looks good.
And, just to show you the pinwheel also looks great even if you cut your squares into triangles in the same direction… take a look at my all red pinwheel example. Only one has been cut in different directions. So, if you mess up and cut a variety of directions… don’t fret! The design will still come together in the end.

Ok wow. So that was long winded! I just really wanted to make sure I was clear.
Sew
Now that you have all your triangles cut you will want to pair your red and blue triangles with white triangles and sew your half square triangles.


After sewing press your seams!
You will have a big pile of red and white half square triangles and a big pile of blue and white half square triangles.
Organize your quilt top layout
Decide on what type of center you will want. Square or Pinwheel.


Then, from then on you will build out in the same pattern.


Lay out your half square triangles to complete your white square and begin your blue square.

Then you will start completing your blue square.
And start your next layer!

After this step you start adding on your red and white half square triangles.

Start your next layer by extending out to complete the white square.

Then fill in the red.

Even out the quilt top by filling the corners.

You will keep working this way to make the quilt top as large as you want.
I am going to complete one more later on all sides.

I finished the red square.

Then I began filling in the blue.

I extended the top and bottom of my quilt longer than the sides. I didn’t want my quilt to be a perfect square.

Sewing
I really like to chain piece my quilt tops when I can. This is my preferred method for two reasons.
- It’s faster
- It saves thread.
While my quilt is laid out I label my rows and pin the first squares I will be sewing together.

The main reason I pin here is just so I know what side of the squares I will be sewing. Even if I don’t need to meed seams here just to stay organized.

I marked the first squares on my rows with letters from my last Sew Sampler box from the Fat Quarter Shop. I held them in place with a wonder clip. If you missed seeing what I received in that monthly box you can check it out HERE.

These Alphabities are adorable and will come in really handy marking not only rows for me when I sew, but keeping track of fabrics I cut to label them per the pattern!
After pinning I carefully stack my rows.

Then I stack in order into one pile that I bring to the sewing machine to chain piece.

After sewing you will press your seams and repeat this process until your quilt top is completely sewn together!

If you would like to purchase your own Alphabities you can grab some by clicking the image below!

If you need some wonder clips you can grab some by clicking the image below!

I find that both of these items really come in handy at this stage of creating the quilt top. As an alternative you can mark your rows by writing on scraps of paper and pinning them to your squares.
Finished
My quilt top is complete and I am so incredibly happy with it!
I ordered the backing fabric, so, when it arrives and I complete the quilting I will post an update!
But for now, here are the finished quilt top photos!


I would love for you to consider subscribing to my blog. You will receive emails when new posts are published!
Bye for now.
Create Beautiful Quilts is a participant in the Amazon Services LLC Associates Program, an affiliate advertising program designed to provide a means for sites to earn advertising fees by advertising and linking to Amazon.com. Some links may be affiliate links. We may get paid if you buy something or take an action after clicking one of these.

6 responses to “Americana – Jelly Roll Quilt”
This has to be one of my most favorite quilts! And I know that I say that every time! But just everything about this one is awesome! Nice job!
LikeLike
You are the best! Thank you!
❤️I love this one too❤️
LikeLike
I absolutely love this quilt! I listen to quilting on you tube or music when a I quilt. I can’t listen to audio books, because I forget to listen. Haha I do love to read though. I love American history and fiction, sort of the old Opra booklist.
LikeLike
Thank you! I know exactly what you mean about forgetting to listen. I usually try to stick with books that are an easy listen and don’t have a complicated storyline.
LikeLike
I was looking for a different quilt on your blog that I had taken a screenshot of from somewhere and came across this. This is a fantastic idea and I love how it turned out. I like the pinwheel middle too, but this is really lovely. And I love this fabric. There is such a great selection of stripes, stars, gingham, etc. Really beautiful!
LikeLike
Thank you! This is my husbands favorite quilt! Did you find the other quilt you were looking for?
LikeLike